Picture of group collection:
 |
| Side view of our group 'MYSTERY/MIRROR' |
 |
| Designer names from left to right:, Ayumi Morita, Siripon Harndee, Estela Nevinskaite, Elizabeth Adegoke, Susanna Yi |
FASHION SHOW :
A dress I made and designed by Elizabeth Adegoke, modelled by Jen Phimdi


MY DESIGNED DRESS MADE BY SUSIE:
 |
| Back view- one shoulder dress, with side back panel |
 |
| Front right panel in patterned fabric |
 |
| Front box pleat by Ayumi's left hand. |
This is just to show the dress that I designed which Susie had finished it before the Fashion show date. Ayumi has kindly modelled the dress and it fits her perfectly. I am thrilled with the result as well as being part of this group. We all worked hard and had done our research thoroughly so that our 'MYSTERY/MIRROR' collection goes well with each other as one. Most importantly we helped each other out to get all the dresses made on time before the fashion show.
I am very looking forward to watching other groups collection as well as our own.
ILLUSTRATION
This illustration is for Susanna Yi's designed dress. It took me 4 hours to think of the composition, materials and the theme that will represent 'mystery/mirror'. I tried to capture the circle as a mirror in a black and orange as a mystery feel? The crescent shape is to show the unique look of the mirror frames. Overall, I think the illustration works well together as the dress is in the centre of the page.
 |
| Materials used: Water colour, fineliner (black). |
PICTURES OF THE FINISHED DRESS (DESIGNED BY ELIZABETH):
Comments: I am very delighted with the result. The dress fits perfectly to a standard size 10 mannequin. Moreover, the black polysatin fabric of the dress has a shiny, lustrous look and feel, which makes the dress eye- catching and desireable. My favourite part of the dress is the contrast colour of the patterned fabric and the black fabric which are hidden when zipped up.
I do believe that the dress represent our theme of '' MYSTERY/MIRROR' . The hidden box pleat is the mystery part that are revealed when the zip is undone. The shiny, lustruous black poly satin represent the mirror effect of its shinyness.
 |
| Close view of box pleat in patterned fabric. |
 |
| Front view. Open box pleat with 2 ways metal zipper at centre front skirt from hipline to hem |
 |
| Side view, the metal zip can be seen when the pleat is opened, which is eye-catching! |
 |
| Back view. Fits nicely on a Size 10 mannequin, centre back invisible zip |
All of us decided to put all of the patterns on the fabrics and divided for each individuals to make the final dresses. For the final, I am making Elizabeth's design; pattern created by Estela's. Before placing the patterns on the fabrics, I had a talk with Estela's about any difficulties she had at the making toile. The talk was a good way of showing our group communications, working as a team and helping each other for the successful final outcome.
Below are some images of the process of the final dress, the difficulties I had:
 |
| Folded the fabric in half, right side to right side together. Marked with lots of pins as the texture of fabric is quite slippery. |
 |
| Marked with chalk for cutting as I found that it is hard cutting the fabric as it is very slippery. |
 |
| Iron on interfacing to the front triangle pleat to stiffen the fabric |
 |
| Right side vs Wrong side (interfacing) This prevents the fabric from stretching when beig stitch or overlock by interfacing. To be attach to the centre front with metal zip. |
 |
| Overlocking the seam with right side down, which I found it is slightly slippery to control. |
 |
| I opted to overlocked the seams with wrong side down so I have better control of the fabric. |
 |
| Metal zip insertation to the centre front skirt, marked with pin, I firstly stitch it down with 1cm seam allowance. It is a metal zip with both ends/ 2ways opening. |
 |
| A closer/zoom image of stitching the zip, 1cm seam allowance, changed to zipper foot so I can stitch it closer. I have a two ways zipper foot for my domestic sewing machine. The zipper foot can be move from left to right by twisting the screw/spring. |
 |
| After stitching the metal zip to the black fabric, I placed a patterned pleat piece to the zip. I had to make sure that the seam matches the length and the edge of the metal zips. Carefully, I pinned it together. Overlocking the edge of the patterned fabric stops it from fraying and stretching too! |
 |
| Stitching the triangle pleat to the zip. Matching seam to seam. |
 |
| After the pleat is stitched to the metal zip, I folded the pleat to the edge stitching line to form a better shaped triangle pleat, then stitch down with edge stitch with the seam facing the wrong side/inside of the dress. |
 |
| Open zip edge. |
 |
| The pleat attached to the zip and centre front skirt. |
 |
| Tricky technical skill of sewing invisible zip to the centre back of dress. |
 |
| Stitching it very close to the zipper, for better result. I had to go slow due to the slippery fabric. |
 |
| This is a front facing piece in patterned fabric to contrast the main fabric in black. I overlocked the edges to prevent it from fraying. |
 |
| With right side & right side together, matched and pinned the front facing to the main front of the dress. All the notches matched which is a brilliant result. |
 | |||
| More pinning ! |
Hemming the skirt: As on Estela's toile for this dress, she has used blind hem. I was thinking about turning the hem up and stitching in placr with simple stitches. With the stitches showing on the hem of the skirt, I opted to stay with Estela's method by hand stitching the hem using blind hem method.
I have no idea how to do blind hem so I looked through a book called : ' New Complete Guide to Sewing ', by Reader's Digests that I loaned from the library. It is very helpful.
http://www.amazon.co.uk/gp/product/0762104201?ie=UTF8&tag=sewbox-21&linkCode=as2&camp=1634&creative=6738&creativeASIN=0762104201
 |
| Reference: http://www.thisnext.com/tag/stepbystep-guide/ |
Blind hem stitch sample: As I have mentioned, I hand stitch the blind hem which was fast and effective, however I was unable to get a clear picture to demonstrate it. I have found a reference picture to show the blind hem:
 |
| Blind hem on wrong side of fabic, hem folded. Reference : http://sewsitall.blogspot.com/2010/10/hand-sewing-basic-stitches.html |
Decision of chosen fabrics and trimmings:
We considered about the fabric throughout the pattern cutting/ toile process and came up with the final decision of using shiny texture fabrics in black and patterned fabrics. Both fabrics are polysatin, 100% polyester at £5 p/m. The fabric was bought at Fabric House, Shepherd Bush. See image below:
 |
| Feather patterns for panels, pleats; to represent mystery theme. |
 |
| Main fabric for our collection: 100% polyester, shiny/mirror effect |
The making of toile
Overview:
During the technical process of the toile, the pattern for the dress has taken upto nearly 3metres on calico due to the length of the skirt. The process of sewing was rather easy to make but there are alot of clipping and pressing the seams for the curve lines and the darts. Nevertheless, attaching the back zips and the tiangle zip was the difficult part. I had to use my patience, neat and analytical skills so that the after result will turn out as accurate as possible and pleasing to the eyes. As I didnt consider about the facing for the dress I have came up with a solution of adding bias binding to the armholes for the finishing.
Self made bias binding from Caryl's demonstration for the curved armholes, picture below:
 |
| Bias binding using calico, measured width is 1.5 cm x 4 to get the folded bias binding just like a ready made one from shop. |
I am very pleased with the final outcome of the toile for Estela's design.
Picture of Estela's design made on a toile:
Two zips for the centre back of the dress because I was unable to find a 2 way open zip for the whole length of the dress.
 |
| Back view with open box pleat |
 |
| Front view, 2 panels at centre front skirt. |
 |
| Side View, Shaped to the waistline. |
Difficulties during pattern cutting for Estela's design:
I had a few difficuties during the making of pattern mainly because the length of the designed dress is too long, measuring 123 cm from hip to hem at both front and back. Thus I had to prepare cutting the dot and cross paper at a very long length. The design looks simple yet I found that it is time consuming. For instance, the panels at the front of the skirt that had to be marked with notches before seperating it from the front and cut away then adding 1cm seam allowance to that panels. Also, the box pleat at the back starting at m hip line had to be measured so that I could calculate right measurements. However I have changed the box pleat into a triangle pleat patterns. At first I found it is rather confusing. After a several minutes of thinking through the pattern of the triangle pleat turned out fine. I have left 2.5 cm seam allowance for the triangle pleat and centre back that has to be attached with zips.
 |
| A quick diagram of triangle pleat pattern piece. |
SLIGHT CHANGES:
There are slight changes to my design as I am trying to keep the design more simple to make, however additional panels have been added to the dress to make it look more interesting: The design of which Ayumi will make as a pattern and a toile is on an image below:
 |
| Added front (right side panel to front and back |
For my dress design, Ayumi will be making a pattern and a calico toile for it. I will be making patterns for Estela's design . Estela's design is on an image below:
 |
| Estela's evening gown design, very well suited her model height. The length of the skirt will be 123 cm from waistline to hem. There are two panels at the centre front, with triangle/box pleat enclosed with zip fastening at the centre back. Mandarin/ chinese neckline. The dress is elegant and sophisticated yet providing mystery to the zip at the back pleat. |
 |
| My final design for Ayumi to make a pattern and a toile. |
Tables of our routines for this module/ making of the dresses:
 |
| Table of tasks for each of us. |
TRIMMINGS SHOP THAT IS RATHER DISCREET!
From researching the fabrics in London with the group, Ayumi (genius) took as to a shop called 'BARNETT LAWSON Trimmings, which is just situated behind oxford street. You have to press the buzzer to get in the shop. As I entered the shop, I was clear that the trimmings are quality product with a fair price. Most of their trimmings are available to sale as wholesale. I was unable to get the inside picture of the shop as there were many people inside and it was quite small.
 |
| 2nd door to the shop |

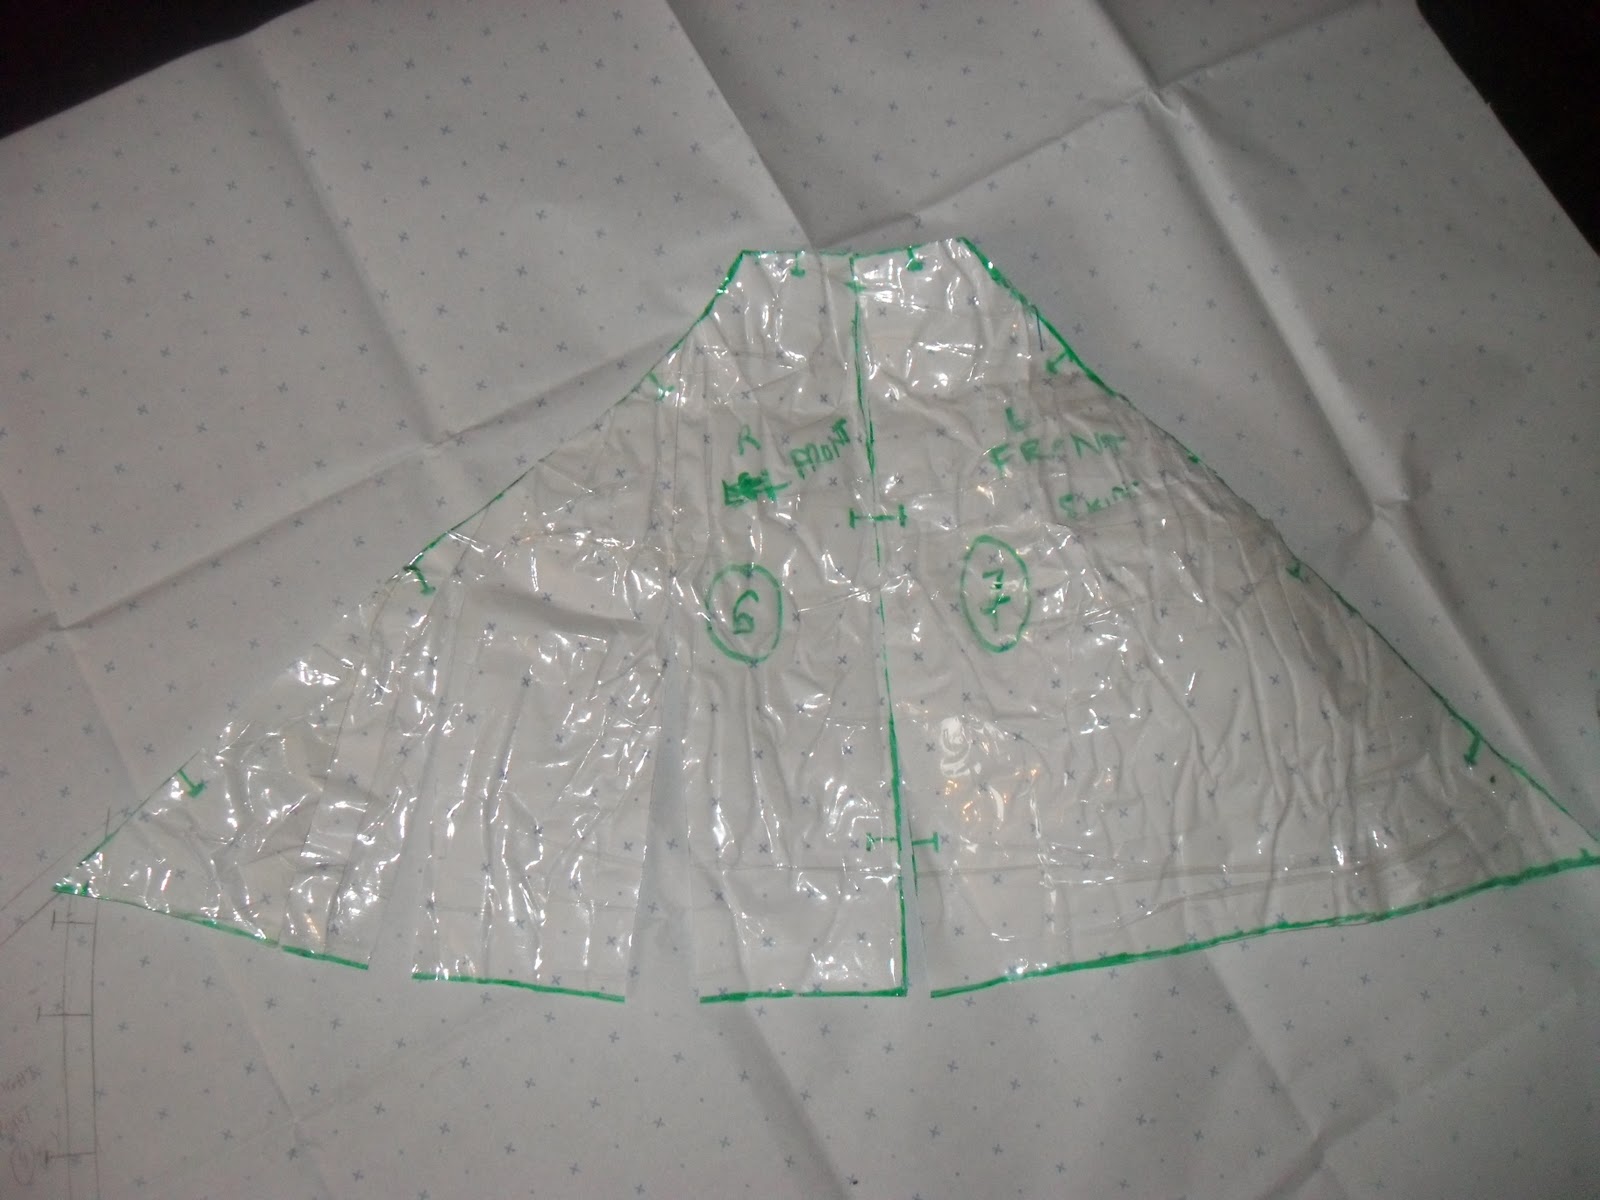
Caryl's Demo on pattern cutting for dress pattern:
It was a very useful to learn how to pattern from using a mannequin as a base of designing dresses then translating it on a pattern. The basic pattern cutting knowledge I learnt via studying at college was very different to Caryl's method. I would learn how to open, slashm close darts and other basic skills at college, however I found Caryl's method very intrigue and successfully understandable.

 |
| Caryl's method, dress pattern on a mannequin wrapped in cellotape. |
 |
| Caryl's drawn design on the dress/mannequin in red pen |
 |
| Removing the pattern fron mannequin by cutting through the side seam. It has taking shape of the mannequin |


My own design and result on toile :
My attempt to pattern cut a dress using Caryl's method turned out successfully well but I like it more if the dress I designed turn out more interesting. However I was pleased with the outcome. The problems I had during the process are as follow:
- Before designing on the mannequin, I had to think about the the flowig lines that must meet each other when drawn on the mannequin.
- Deciding where to have the side seam or middle seam. I decided not to have a side seam but centre back seam instead so I had to cut the pattern at CB to remove it from mannequin.
- Lastly I had to think of a way to flatten the skirt pattern so that I can translate it on a dots & crosses paper. I resolved the problems by adding flare to skirt which I had to cut throught bottom seam on the skirt pattern. See 5th image.
 |
| Design on a mannequin, front view. |
 |
| Open back design, back view. |


 |
| Pattern piece of front/back, curved armhole. marked lots of notches or balance marks |
 |
| The skirt pattern didn't lay flat, there was a bulge. |
 |
| To solve the problem I made 2 slashes on the skirt for the flares, as well as to keep the pattern flat. |
 |
| All patterns are drawn, measure and adjusted. It took me over one hour to get every pattern pieces down. |
 |
| Toile of my design, it has taken me 2 hours to cut out on fabric and sewn it up. |
 |
| Open back view with centre back zip at skirt |
 |
| Side view. I am considering of making this in harder fabric with combination on stretchy fabric for top bodice i.e Jersey. I have found the the open 'U' back shape has stretches after I have stitches. To solve the problem, I should have stay stitch the edge first so that the fabric doesnt stretch. FABRIC RESEARCH TRIP, CENTRAL LONDON  Fabric Research is essential to this module. Our group of five people include myself, Ayumi Morita, Susie, Estela, Elizabeth (2nd year) went to search for fabrics in differnet streets of central London. We paid particular interests with getting samples that matches our concept of 'MIRROR/MYSTERY'. Fabric colours such as silver, shiny texture, multi-coloured, dark/ black were the key to representing 'Mirror/Mystery'. The images as shown below are the sample I have chosen that reflects our concept. I particularly lik the sample from Cloth house, especially the silver Lamés. My overall perception of fabric research was interesting despite having been to these fabric shops in Soho before during my time at college. Moreover, I love the fact that McCullught and Wallace LTD fabric (just a few yards from Oxford Street) were generous with providing samples for students, with self servocxe of cut out samples. In addition, McCullugh and Wallace also have the website as follow : http://www.macculloch-wallis.co.uk/Default.aspx so that we can view the fabrics, trimmings/ haberdashery as well as pattern making equipments online, thus making it easier and accessible to do online shopping! Five different samples shown below from McCullugh & Wallace LTD.   Design Ideas All of us had to design the dresses based on the images that we had gathered. My design ideas are as follow:       Final Design Chosen to construct into a pattern and a dress:  The above image has been developed to an interesing yet simple design for the dress can be made in time. OUR GROUP CONCEPT- 1ST WEEK Concept word: Mirror/ Mystery Group names: Siripon Harndee, Ayumi Morita, Susanna Yi, Estela Nevinskaite, and Elizabeth Adegoke. We were all interested and keen after having read the module of 'Explore Materials'. It is all about gaining more fabrics, pattern cutting knowledge into our fashion student brains. Having decided and agreed on our concept word, we did research from WGSN site in particular of finding the colour schemes for 'Mirror/Mystery with zips as part of our concept too! Then we all gathered research taken from books as well as images from internet and putting it on moodboard so we all have a clear steer to designing dresses for our concept word. Research images from WGSN, fashion books and internet as follow:     |